How to wire ring floodlight – Installing a Ring Floodlight can significantly enhance your home’s security and illuminate your property. This guide provides a comprehensive walkthrough of the wiring process, ensuring a safe and successful installation. We’ll cover the essentials, from understanding the wiring components and safety precautions to troubleshooting common issues and connecting your floodlight to existing wiring.
Whether you’re a seasoned DIY enthusiast or a novice tackling your first home improvement project, this step-by-step approach will equip you with the knowledge and confidence to wire your Ring Floodlight effectively. Let’s delve into the details and empower you to illuminate your home with confidence.
Understanding Ring Floodlight Wiring

Installing a Ring Floodlight requires understanding its wiring system. This involves identifying the components, recognizing different wiring configurations, and comprehending the wiring diagram.
Basic Components of a Ring Floodlight Wiring System
The Ring Floodlight wiring system typically includes the following components:
- Floodlight Fixture: The main housing that holds the light bulbs and the electrical components.
- Power Supply: This provides the necessary voltage to power the floodlight. It may be integrated into the fixture or a separate unit.
- Wiring Harness: A set of wires that connect the floodlight fixture to the power supply and the electrical panel.
- Circuit Breaker: This device protects the wiring from overloads and short circuits.
- Ground Wire: This wire provides a path for electrical current to flow to the ground in case of a fault.
- Neutral Wire: This wire carries the return current from the floodlight back to the electrical panel.
- Hot Wire: This wire carries the electrical current from the electrical panel to the floodlight.
Types of Wiring Configurations
Ring Floodlights can be wired in different configurations depending on the existing wiring and the desired features. Here are some common configurations:
- Direct Wiring: The floodlight is directly connected to the electrical panel using a dedicated circuit breaker. This is the simplest and most common configuration.
- Switch Wiring: The floodlight is connected to a switch that allows you to turn it on and off manually. This configuration provides basic control over the floodlight.
- Smart Home Integration: The floodlight can be integrated with a smart home system, allowing you to control it remotely using your smartphone or voice commands.
Wiring Diagram for a Ring Floodlight
A wiring diagram is a visual representation of how the electrical components of a Ring Floodlight are connected. It helps you understand the wiring process and troubleshoot any issues. Here’s a typical wiring diagram for a Ring Floodlight:
[Insert a simple illustration of a wiring diagram showing the floodlight fixture, power supply, circuit breaker, ground wire, neutral wire, and hot wire. Label each component clearly.]
The diagram shows the hot wire (usually black) connecting to the floodlight fixture, the neutral wire (usually white) connecting to the fixture, and the ground wire (usually green) connecting to the fixture. The hot and neutral wires also connect to the circuit breaker in the electrical panel. The ground wire connects to the ground bus bar in the electrical panel.
Essential Tools and Materials

Having a solid understanding of Ring Floodlight wiring is essential, but you’ll also need the right tools and materials to ensure a successful installation. This section will provide a comprehensive list of the essential tools and materials you’ll need, making your installation process smoother and more efficient.
Tools
The right tools are crucial for a safe and efficient installation. Having these tools on hand will make the process easier and ensure you have everything you need.
- Voltage Tester: A voltage tester is vital for ensuring that the power is off before you begin working on the wiring. This crucial safety measure helps prevent electric shocks.
- Wire Strippers: Wire strippers are essential for removing the insulation from electrical wires, exposing the bare copper conductors for safe and secure connections.
- Wire Crimpers: Wire crimpers are used to securely connect wire terminals to the wires, ensuring a reliable and lasting connection.
- Phillips Screwdriver: A Phillips screwdriver is necessary for removing and installing screws that hold the Ring Floodlight in place, as well as for connecting the wiring.
- Wire Cutter: Wire cutters are used for cleanly cutting wires to the correct length, ensuring a professional finish and preventing frayed ends.
- Ladder: A sturdy ladder is essential for reaching the mounting location for the Ring Floodlight, ensuring a safe and comfortable installation.
- Level: A level is crucial for ensuring that the Ring Floodlight is mounted straight and even, resulting in a professional and aesthetically pleasing installation.
Materials, How to wire ring floodlight
Having the right materials ensures that your Ring Floodlight installation is complete and meets all safety requirements. Here’s a list of essential materials you’ll need:
- Ring Floodlight: This is the centerpiece of your installation, providing security and illumination for your property.
- Electrical Wire: You’ll need electrical wire to connect the Ring Floodlight to your existing electrical system. The type and gauge of wire will depend on the specific requirements of your installation.
- Wire Connectors: Wire connectors, often called wire nuts, are used to join wires together securely, ensuring a reliable electrical connection.
- Wire Terminals: Wire terminals are small metal connectors that are used to connect wires to the Ring Floodlight’s terminals. These terminals ensure a secure and reliable connection.
- Mounting Bracket: The mounting bracket is used to securely attach the Ring Floodlight to the wall or other surface. It provides a stable and secure base for the Floodlight.
- Screws: Screws are used to secure the mounting bracket to the wall and to attach the Ring Floodlight to the bracket. These screws should be the appropriate size and type for your specific installation.
- Electrical Tape: Electrical tape is used to insulate exposed wires, preventing short circuits and ensuring safety. It’s important to use high-quality electrical tape for reliable insulation.
Tools and Materials Summary
| Tool/Material | Function |
|---|---|
| Voltage Tester | Ensures power is off before working on wiring |
| Wire Strippers | Removes insulation from electrical wires |
| Wire Crimpers | Securely connects wire terminals to wires |
| Phillips Screwdriver | Removes and installs screws for mounting and wiring |
| Wire Cutter | Cleanly cuts wires to the correct length |
| Ladder | Reaches the mounting location safely |
| Level | Ensures the Floodlight is mounted straight |
| Ring Floodlight | Provides security and illumination |
| Electrical Wire | Connects the Floodlight to the electrical system |
| Wire Connectors | Joins wires together securely |
| Wire Terminals | Connects wires to the Floodlight’s terminals |
| Mounting Bracket | Securely attaches the Floodlight to the wall |
| Screws | Secures the mounting bracket and Floodlight |
| Electrical Tape | Insulates exposed wires |
Safety Precautions
Wiring a ring floodlight is a task that requires careful attention to safety. Neglecting safety precautions can lead to serious injury or even death. It’s essential to prioritize safety throughout the entire process.
Disconnecting Power
The most important safety precaution is to disconnect power to the circuit you’re working on before starting any wiring. This is crucial to prevent electrical shock.
- Locate the circuit breaker controlling the floodlight’s power supply.
- Turn off the breaker, and confirm it’s off by checking if the floodlight is no longer powered.
- Use a voltage tester to double-check that the circuit is indeed de-energized.
Handling Electrical Wires and Components
Properly handling electrical wires and components is essential for safety.
- Wear insulated gloves to protect your hands from electrical shock.
- Use insulated tools, such as pliers and wire strippers.
- Avoid touching bare wires with your hands.
- Always work with dry hands and feet.
- Keep wires away from heat sources, as this can damage insulation and expose wires.
- Avoid working on electrical wiring in wet conditions.
- Do not overload circuits.
- Use wire connectors designed for the wire gauge and type you are working with.
- Inspect wires and components for damage before use.
- If you encounter any damaged or frayed wires, replace them immediately.
Step-by-Step Wiring
Now that you have gathered all the necessary tools and materials and have taken the necessary safety precautions, you can start wiring your Ring Floodlight. Follow these steps carefully for a successful installation.
Wiring the Ring Floodlight
The following steps will guide you through the process of wiring your Ring Floodlight:
| Step | Description | Image |
|---|---|---|
| 1 | Turn off the power to the circuit breaker that controls the light fixture. This is crucial for safety and prevents electrical shocks. | An image depicting a person turning off a circuit breaker. The image should clearly show the circuit breaker switch in the “off” position. |
| 2 | Remove the old light fixture. Unscrew the mounting plate and carefully disconnect the wires. Make sure to note the wire colors (usually black for hot, white for neutral, and green or bare copper for ground) to ensure correct reconnection. | An image showing a person removing an old light fixture. The image should clearly show the process of disconnecting the wires and the wire colors. |
| 3 | Mount the Ring Floodlight base to the wall using the provided screws and anchors. Ensure the base is level and securely mounted. | An image showing a person mounting the Ring Floodlight base to the wall. The image should clearly show the base being secured with screws and anchors. |
| 4 | Connect the wires to the Ring Floodlight. Match the wire colors: black to black, white to white, and green or bare copper to green or bare copper. Use wire connectors to secure the connections. | An image showing a person connecting the wires to the Ring Floodlight. The image should clearly show the wire connections being made with wire connectors. |
| 5 | Carefully tuck the wires into the junction box and secure the Ring Floodlight to the base. | An image showing a person tucking the wires into the junction box and securing the Ring Floodlight to the base. |
| 6 | Turn the power back on at the circuit breaker. Test the Ring Floodlight by switching it on and off. Make sure the light turns on and off as expected. | An image showing a person turning on the power at the circuit breaker. The image should clearly show the circuit breaker switch in the “on” position. |
Troubleshooting Common Wiring Issues
Even with careful installation, wiring problems can occur. Understanding common issues and troubleshooting techniques can save you time and frustration. This section will cover common wiring problems and provide practical solutions to get your Ring Floodlight working properly.
Identifying Common Wiring Problems
Identifying the root cause of a wiring issue is crucial for effective troubleshooting. Common wiring problems can be categorized as follows:
- Incorrect Wiring Connections: This is the most frequent issue, where wires are connected to the wrong terminals or the connections are loose. Incorrect wiring can lead to the floodlight not turning on, flickering, or malfunctioning.
- Circuit Breaker Issues: A tripped circuit breaker can prevent power from reaching the floodlight. This could be caused by an overloaded circuit or a short circuit in the wiring.
- Faulty Wiring: Damaged or corroded wires can interrupt the flow of electricity. This can occur due to improper installation, exposure to the elements, or age.
- Power Source Problems: The power source itself may be faulty or insufficient to power the floodlight. Check the voltage and amperage rating of the power source to ensure it meets the floodlight’s requirements.
Troubleshooting Techniques for Common Wiring Problems
Here are some practical techniques for troubleshooting common wiring issues:
- Visual Inspection: Begin by carefully inspecting the wiring for any visible damage, loose connections, or signs of corrosion. This often reveals the problem quickly.
- Circuit Breaker Check: Verify that the circuit breaker controlling the floodlight is turned on and not tripped. Reset the breaker if it is tripped and see if the floodlight powers on.
- Voltage and Amperage Check: Use a multimeter to measure the voltage and amperage at the power source. Compare these readings to the floodlight’s specifications to ensure they are within acceptable limits.
- Continuity Testing: Use a multimeter to test the continuity of the wires. This helps identify any breaks or open circuits in the wiring.
- Testing with a Light Bulb: If you suspect a power source problem, connect a known working light bulb to the same circuit to see if it illuminates. This helps determine if the power source is faulty or if the issue is specific to the floodlight.
Troubleshooting Flowchart for Common Wiring Problems
A flowchart can help streamline your troubleshooting process. Here’s a basic flowchart outlining common steps for resolving wiring issues:
[Flowchart Image Description: The flowchart starts with a decision point: “Is the floodlight powered on?”. If yes, then the troubleshooting ends. If no, the flowchart branches to a decision point: “Is the circuit breaker tripped?”. If yes, reset the breaker and try again. If no, the flowchart branches to a decision point: “Are there any visible wiring issues?”. If yes, inspect and repair the wiring. If no, the flowchart branches to a decision point: “Is the power source sufficient?”. If yes, check the wiring connections and continuity. If no, replace the power source or consult an electrician. The flowchart ends with the floodlight being powered on.]
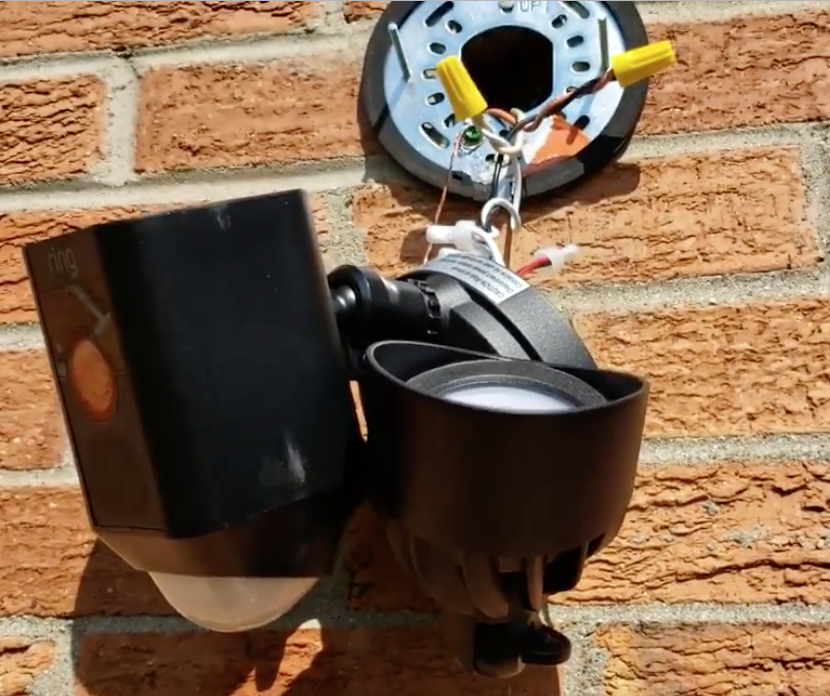
Connecting to Existing Wiring
Connecting your Ring Floodlight to your existing wiring is a straightforward process. The floodlight typically comes with instructions, but this guide provides a detailed breakdown of the process.
Identifying the Correct Wires
Identifying the correct wires is crucial for a safe and functional installation.
- The Ring Floodlight typically has three wires: a neutral wire (white), a hot wire (black), and a ground wire (green or bare copper).
- Your existing wiring will also have these three wires, which you’ll need to match with the floodlight’s wires.
- To identify the wires, you can use a voltage tester or a wire stripper. A voltage tester will indicate the presence of electricity in a wire, while a wire stripper will remove the insulation to reveal the wire’s color.
- Be sure to turn off the power to the circuit before working with any wires.
Connecting the Wires
Once you’ve identified the correct wires, you can connect them to the Ring Floodlight.
- Connect the neutral wire (white) from the floodlight to the neutral wire (white) in your existing wiring.
- Connect the hot wire (black) from the floodlight to the hot wire (black) in your existing wiring.
- Connect the ground wire (green or bare copper) from the floodlight to the ground wire (green or bare copper) in your existing wiring.
- Ensure all connections are secure and tightly fastened. You may need to use wire connectors to join the wires.
- After making all connections, turn the power back on and test the floodlight.
Additional Wiring Considerations
When installing a Ring Floodlight, there are a few additional wiring considerations to keep in mind, depending on the specific model and desired functionality.
Wiring Ring Floodlights with Different Features
The wiring process for Ring Floodlights can vary depending on the specific model and its features. Here’s a breakdown of some common scenarios:
- Ring Floodlight with Motion Detection: These floodlights typically have built-in motion sensors that trigger the light to turn on when movement is detected. The wiring for this type of floodlight is usually straightforward, requiring a standard three-wire connection (hot, neutral, and ground). The motion sensor is integrated within the floodlight fixture, eliminating the need for separate wiring.
- Ring Floodlight with Battery Backup: Some Ring Floodlights offer battery backup functionality, allowing them to operate even during power outages. These models usually have a dedicated terminal for connecting the battery backup system. The wiring process involves connecting the standard three-wire connection to the floodlight and then connecting the battery backup system to its designated terminal.
- Ring Floodlight with Smart Home Integration: If you want to integrate your Ring Floodlight with a smart home system, you may need additional wiring for connectivity. Depending on the specific smart home system, this could involve connecting the floodlight to a hub or using a specialized wiring protocol. Consult the Ring Floodlight’s user manual or the smart home system’s documentation for specific wiring instructions.
Wiring a Ring Floodlight with Motion Detection
Motion detection capabilities in Ring Floodlights are typically integrated within the fixture, eliminating the need for separate wiring. The floodlight itself includes a motion sensor that triggers the light to turn on when movement is detected. The wiring process is similar to standard floodlight installations, requiring a three-wire connection (hot, neutral, and ground).
Connecting a Ring Floodlight to a Smart Home System
Connecting a Ring Floodlight to a smart home system like Amazon Alexa, Google Home, or Apple HomeKit can enhance your home’s automation capabilities. To achieve this, you’ll need to ensure that the floodlight is compatible with your chosen smart home system.
- Compatibility Check: Verify that your Ring Floodlight is compatible with your desired smart home system. Check the product specifications or consult the Ring website for compatibility information.
- Smart Home Hub: Most smart home systems require a central hub to connect and control devices. If you don’t already have a hub, you’ll need to purchase one compatible with your chosen system.
- Connection Method: The connection method for integrating your Ring Floodlight with a smart home system will depend on the specific system and the floodlight model. Some systems might use a dedicated app or require you to enable specific settings within the floodlight’s interface.
- Wi-Fi Network: Ensure your Ring Floodlight is connected to your Wi-Fi network for seamless communication with the smart home system.
With a little patience and careful attention to detail, wiring your Ring Floodlight can be a rewarding experience. By following these steps and adhering to safety guidelines, you’ll ensure a secure and functional installation that enhances your home’s security and peace of mind. Remember, if you encounter any challenges or feel unsure about any aspect of the wiring process, it’s always best to consult a qualified electrician for assistance.
Detailed FAQs: How To Wire Ring Floodlight
What tools are absolutely necessary for wiring a Ring Floodlight?
Essential tools include a voltage tester, wire strippers, a Phillips head screwdriver, and a pair of pliers. Additionally, you may need a ladder, a drill, and a level for proper mounting.
Can I wire a Ring Floodlight to a dimmer switch?
No, Ring Floodlights are not compatible with dimmer switches. They require a direct connection to a standard electrical outlet or circuit breaker.
What if I encounter a wiring issue during the installation?
If you experience any wiring problems, it’s crucial to disconnect power to the circuit before troubleshooting. Refer to the troubleshooting section in this guide or consult a qualified electrician for assistance.