How to jump a bike battery – a question that often arises when your beloved two-wheeled companion refuses to come alive. The feeling of a dead battery can be frustrating, leaving you stranded and longing for the open road. But fear not, for the ability to jump-start your bike battery is a valuable skill that can empower you to reclaim your freedom.
Understanding the different types of bike batteries, identifying the root cause of the problem, and mastering the art of jump-starting are all essential steps in this process. Prepare to embark on a journey of knowledge and empowerment, as we explore the intricacies of reviving your bike’s battery and unlocking its potential to soar.
This guide delves into the nuances of jump-starting your bike battery, encompassing everything from identifying battery issues to choosing the right jump-starting method. We will equip you with the knowledge and practical skills to tackle this common predicament with confidence. By the end of this journey, you’ll be equipped to handle any battery-related challenges with ease, ensuring that your bike is always ready to take you wherever you desire.
Understanding Bike Battery Types

Yo, so you’re probably thinking about upgrading your ride with an electric bike. But before you go all out, you gotta know the different types of batteries out there. Choosing the right one can make a huge difference in your ride’s performance, lifespan, and how long you gotta wait for it to charge.
Types of Bike Batteries
Different batteries have different pros and cons, and they’re not all created equal. Here’s the lowdown on the most common types:
- Lead-Acid Batteries: These are the OG batteries, like what you find in your car. They’re cheap and reliable, but they’re also heavy and bulky. They’re not the best for e-bikes because they don’t hold a lot of charge and they don’t last as long as other types.
- Lithium-Ion Batteries: These are the most popular type for e-bikes. They’re lighter, more powerful, and have a longer lifespan than lead-acid batteries. They come in different varieties, like lithium-iron phosphate (LiFePO4) and lithium-nickel-manganese-cobalt oxide (NMC).
- Nickel-Metal Hydride Batteries: These are kinda like a middle ground between lead-acid and lithium-ion batteries. They’re not as heavy as lead-acid batteries, but they’re not as light or powerful as lithium-ion batteries. They’re also not as long-lasting.
Battery Performance and Lifespan
- Lead-Acid Batteries: They have a lower capacity than lithium-ion batteries, meaning they can’t hold as much charge. They also have a shorter lifespan, usually around 300-500 charge cycles.
- Lithium-Ion Batteries: These batteries are the kings of performance. They have a higher capacity, meaning they can hold more charge and give you longer range. They also have a longer lifespan, with some models lasting up to 1,000 charge cycles.
- Nickel-Metal Hydride Batteries: They have a lower capacity and shorter lifespan than lithium-ion batteries, but they’re still better than lead-acid batteries.
Battery Charging Time
- Lead-Acid Batteries: These batteries take the longest to charge, usually 8-12 hours.
- Lithium-Ion Batteries: They charge much faster than lead-acid batteries, usually 2-4 hours. Some even have fast-charging capabilities that can charge them in under an hour.
- Nickel-Metal Hydride Batteries: They charge faster than lead-acid batteries, but slower than lithium-ion batteries, usually 4-6 hours.
Battery Voltage and Capacity
- Voltage: The voltage of a battery determines its power output. A higher voltage means more power. Most e-bikes use batteries with a voltage of 24V, 36V, or 48V.
- Capacity: The capacity of a battery determines how much charge it can hold. A higher capacity means a longer range. Capacity is measured in amp-hours (Ah). A 10Ah battery can deliver 10 amps of current for one hour, or 5 amps for two hours.
Identifying Battery Issues
So, your bike’s battery is acting up, and you’re not sure what’s going on. Don’t worry, it happens to the best of us! Sometimes, it’s a simple fix, but other times, it could be a sign of a bigger problem. Let’s dive into some common symptoms that might indicate a dead or dying battery.
Symptoms of a Dead or Dying Battery, How to jump a bike battery
A dead or dying battery can cause some serious issues with your bike. It can lead to a slow start, a complete failure to start, or even a sudden loss of power while riding. Here are some common symptoms to look out for:
- Your bike struggles to start, and the engine turns over slowly.
- The headlights are dim, or the taillights don’t work.
- The horn is weak or doesn’t work at all.
- The electrical components, like the turn signals or brake lights, are acting up.
- The battery is leaking or bulging.
- The battery terminals are corroded.
Causes of Battery Failure
Battery failure can be caused by a variety of factors. Here are some of the most common causes:
- Overcharging: Leaving your battery on the charger for too long can cause it to overheat and damage the internal components. Think of it like this: It’s like constantly eating too much food. You’ll eventually get sick! It’s the same with batteries. They need to be charged properly to function well.
- Deep Discharge: Draining your battery completely can also shorten its lifespan. Just like you need to eat regularly, batteries need to be charged regularly. If you let it go too long, it can die on you.
- Extreme Temperatures: Both extreme heat and cold can affect battery performance and lifespan. Imagine your phone in the summer sun. It’s going to get super hot and the battery will drain fast. Same with your bike’s battery!
- Age: Like anything else, batteries have a limited lifespan. After a few years, even with proper care, a battery will start to lose its ability to hold a charge.
- Corrosion: Corrosion on the battery terminals can prevent a good connection and hinder the flow of electricity. Think of it like rust on a bike chain. It prevents the chain from moving smoothly. The same can happen with battery terminals.
Checking Battery Voltage
The best way to determine if your battery is dead or dying is to check its voltage. You can do this using a multimeter, which is a handy tool that measures electrical values. Here’s how to do it:
- Turn off your bike and disconnect the battery terminals.
- Set your multimeter to the DC voltage setting.
- Connect the positive (red) lead of the multimeter to the positive terminal of the battery.
- Connect the negative (black) lead of the multimeter to the negative terminal of the battery.
- Read the voltage displayed on the multimeter.
A fully charged battery should have a voltage of around 12.6 volts. If the voltage is significantly lower, it means your battery is weak and needs to be replaced. A voltage reading of 12.0 volts or lower usually indicates a battery that is at least 50% discharged.
Jumper Cable Setup and Safety

Yo, so you’ve got a dead bike battery and you’re ready to jumpstart it. It’s a simple process, but safety first, right? We’re talking about electricity here, and it’s super important to be careful.
Jumper Cable Setup
Alright, let’s get into the details. You’re gonna need a few things to jumpstart your bike battery:* Jumper Cables: These are the key players. Make sure you’re using cables specifically designed for motorcycle batteries, as they have a lower voltage than car batteries.
Donor Vehicle
This is the vehicle with the good battery that’s gonna give your bike’s battery a jumpstart. It can be a car, truck, or another motorcycle.
Safety Glasses
Always wear eye protection when working with batteries, just in case of any acid spills.
Connecting the Jumper Cables
Now, let’s connect those cables:
1. Positive to Positive
Connect the red cable (positive) to the positive terminal of your bike battery.
2. Positive to Positive (Donor Vehicle)
Connect the other end of the red cable to the positive terminal of the donor vehicle’s battery.
3. Negative to Negative (Donor Vehicle)
Connect the black cable (negative) to the negative terminal of the donor vehicle’s battery.
4. Negative to Ground (Bike)
Connect the other end of the black cable to a metal ground point on your bike’s frame, away from the battery.
Safety Precautions
Remember, safety is key:* Wear Eye Protection: Always wear safety glasses when working with batteries to protect your eyes from potential acid spills.
Avoid Contact with Metal Parts
Be careful not to touch any metal parts while connecting the jumper cables, as this can cause a short circuit.
Don’t Leave Cables Connected
Once your bike battery is charged, remove the jumper cables immediately to avoid damaging the batteries.
Don’t Jumpstart for Too Long
Don’t jumpstart your bike battery for more than a few minutes, as this can overheat the batteries.
Jump-Starting the Bike
Alright, so you’ve got your jumper cables hooked up, and your donor vehicle is ready to roll. Now it’s time to get that bike battery back to life! This part is pretty straightforward, but it’s important to follow the steps carefully to avoid any mishaps.
Starting the Donor Vehicle
Before you can jump-start your bike, you need to make sure the donor vehicle is running. This will provide the necessary power to jump-start your bike’s battery.
Connecting the Jumper Cables
Now, you’re going to connect the jumper cables to both vehicles. Make sure the engine of the donor vehicle is running.
- Red cable (positive): Connect the red cable to the positive (+) terminal of the donor vehicle’s battery. Then, connect the other end of the red cable to the positive (+) terminal of the bike’s battery.
- Black cable (negative): Connect the black cable to the negative (-) terminal of the donor vehicle’s battery. Then, connect the other end of the black cable to a metal grounding point on the bike’s frame, away from the battery.
Attempting to Start the Bike
Once the jumper cables are connected, wait a few minutes to allow the current to flow from the donor vehicle to the bike’s battery. Then, try to start the bike. If the bike starts, you’re good to go!
Disconnecting the Jumper Cables
Once your bike is running, you need to disconnect the jumper cables in the correct order to avoid any electrical sparks or damage.
- Disconnect the black cable from the bike’s frame.
- Disconnect the black cable from the donor vehicle’s battery.
- Disconnect the red cable from the bike’s battery.
- Disconnect the red cable from the donor vehicle’s battery.
Troubleshooting
If the bike doesn’t start after jump-starting, there could be a few reasons why. Here are a few things to check:
- Check the battery connections: Make sure all the connections are secure and that the cables are not touching any metal parts of the bike.
- Check the battery: If the battery is old or damaged, it may not be able to hold a charge. You may need to replace the battery.
- Check the starter: The starter motor could be faulty. If you’re not sure, it’s best to take your bike to a mechanic.
Alternative Jump-Starting Methods
So, jump-starting your bike’s battery with jumper cables is a tried-and-true method, but it’s not always the most convenient or practical option. If you’re stuck in a bind and don’t have access to another bike or a friendly mechanic, you might want to consider some alternative jump-starting methods. There are a couple of other ways to get your bike’s battery back in action.
You can either use a battery charger or a portable jump starter. These methods are more convenient and might be more practical in some situations.
Using a Battery Charger
A battery charger is a device that uses electricity to charge a dead or depleted battery. It’s a common tool for anyone who owns a motorcycle, car, or any other vehicle with a battery. You can find battery chargers at most auto parts stores and online retailers.Battery chargers are super convenient, especially if you have a garage or a place where you can plug it in.
They’re also pretty affordable, with options ranging from basic models to more advanced ones with multiple features. The best part? Battery chargers are super safe to use. They have built-in safety features that prevent overcharging and damage to your battery. Here’s how to use a battery charger:
1. Connect the charger to the battery
Connect the positive (red) clamp to the positive terminal of the battery and the negative (black) clamp to the negative terminal.
2. Plug the charger into an outlet
Make sure the outlet is properly grounded.
3. Turn the charger on
The charger will start charging the battery.
4. Check the charger’s instructions
The charging time will vary depending on the battery’s capacity and the charger’s amperage.
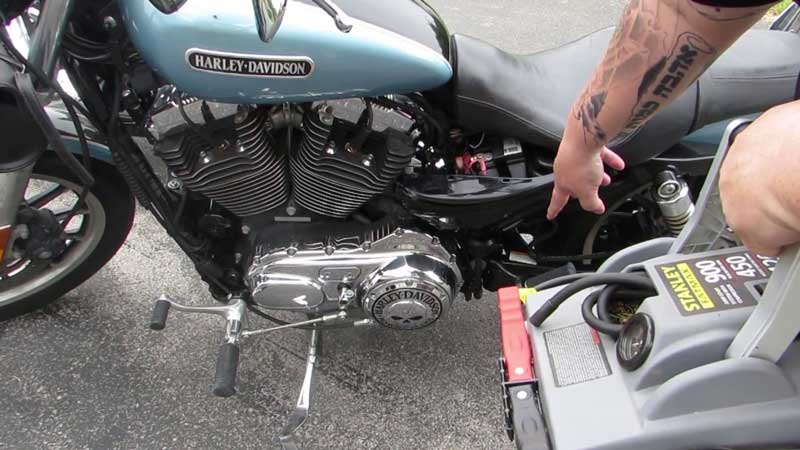
Using a Portable Jump Starter
A portable jump starter is a compact device that can provide a temporary power boost to a dead battery. It’s basically a small, portable battery that can deliver enough power to jump-start your bike. Portable jump starters are perfect for those who don’t have access to a wall outlet or are always on the go. They’re also pretty handy for situations where you need to jump-start your bike in a remote location.While portable jump starters are super convenient, they can be a bit pricier than battery chargers.
But they’re still a great investment if you’re a frequent traveler or someone who enjoys going on long rides.Here’s how to use a portable jump starter:
1. Charge the jump starter
Charge the jump starter fully before using it.
2. Connect the jump starter to the battery
Connect the positive (red) clamp to the positive terminal of the battery and the negative (black) clamp to the negative terminal.
3. Start the bike
Turn the ignition key and start the bike.
4. Disconnect the jump starter
Once the bike is running, disconnect the jump starter from the battery.
5. Keep the jump starter charged
Charge the jump starter fully after each use.
Comparing Battery Chargers and Portable Jump Starters
| Feature | Battery Charger | Portable Jump Starter ||—|—|—|| Convenience | More convenient for home use | More convenient for on-the-go use || Cost | Generally more affordable | Generally more expensive || Effectiveness | Effective for fully charging a dead battery | Effective for providing a temporary power boost || Safety | Very safe with built-in safety features | Safe when used correctly |
Preventing Battery Issues
Yo, let’s talk about how to keep your bike battery from going kaput! It’s all about giving it some TLC so it can keep powering your rides for ages.
Proper Charging Practices
Charging your battery right is super important, so you don’t fry it or leave it with a low charge. Here’s the deal:* Use the Right Charger: Make sure you’re using the charger that came with your battery or one that’s specifically designed for your battery type. Using the wrong charger can damage your battery.
Charge When Needed
Don’t let your battery completely die before you charge it. Aim to charge it when it’s around 20% or 30% charged.
Avoid Overcharging
Once your battery is fully charged, unplug it. Leaving it plugged in for too long can shorten its lifespan.
Charge in a Cool Place
Don’t charge your battery in extreme heat or cold. It can mess with its performance.
Don’t Charge While Riding
Never charge your battery while you’re riding. It can be dangerous and damage your battery.
Storage Procedures
When you’re not riding, it’s crucial to store your battery correctly to keep it in tip-top shape. Here’s the lowdown:* Store at Room Temperature: Store your battery in a cool, dry place. Extreme temperatures can hurt your battery.
Charge Before Storage
Before you store your battery for a long time, charge it to around 80%. This will help prevent it from losing too much charge.
Store Separately
Store your battery separately from your bike. This will help prevent accidental damage or short circuits.
Avoiding Extreme Temperatures
You know how extreme heat or cold can be a total buzzkill? Well, the same goes for your battery. * Protect from Heat: Don’t leave your battery in direct sunlight or in a hot car. The heat can damage the battery.
Protect from Cold
Don’t leave your battery in a freezing cold environment. The cold can also hurt its performance.
Battery Type Charging and Storage Recommendations
Here’s a table with some general guidelines for different battery types:| Battery Type | Recommended Charging Interval | Recommended Storage Conditions ||—|—|—|| Lead Acid | Charge every 3-6 months | Store in a cool, dry place at room temperature || Lithium-ion | Charge every 1-3 months | Store in a cool, dry place at room temperature || Nickel-Cadmium | Charge every 1-2 months | Store in a cool, dry place at room temperature || Nickel-Metal Hydride | Charge every 1-2 months | Store in a cool, dry place at room temperature |Remember, these are just general guidelines.
Always check your battery’s manual for specific charging and storage instructions.
Reviving a dead bike battery is a testament to the power of knowledge and preparedness. By understanding the intricacies of battery types, identifying the root cause of the problem, and mastering the art of jump-starting, you gain a newfound independence. The ability to jump-start your bike battery not only saves you from frustration but also empowers you to conquer any unexpected challenges on the road.
Embrace this newfound knowledge, and let your bike’s journey continue without interruption.
Top FAQs: How To Jump A Bike Battery
What if the bike doesn’t start after jump-starting?
If your bike still doesn’t start after jump-starting, there might be other issues like a faulty starter motor, a bad connection, or even a problem with the ignition system. It’s recommended to consult a mechanic for further diagnosis.
How often should I charge my bike battery?
The charging frequency depends on the type of battery and usage. For lead-acid batteries, charging every few weeks is generally sufficient, while lithium-ion batteries may require less frequent charging. Consult your battery’s manual for specific recommendations.
Can I use a car battery to jump-start my bike battery?
Yes, you can use a car battery to jump-start your bike battery as long as the car battery has enough power and the jumper cables are rated for the amperage required. However, always ensure proper polarity and safety precautions.