How to remove pressure washer pump from honda engine is a crucial procedure demanding meticulous attention to detail. Failure to follow proper protocols can lead to significant damage to both the pump and the engine. This comprehensive guide provides a step-by-step analysis, highlighting potential pitfalls and offering practical solutions.
This detailed guide addresses the critical aspects of disassembling the pressure washer pump from the Honda engine. Proper technique is essential to prevent costly repairs or further damage. We delve into the specific mounting points, fasteners, and potential challenges, equipping you with the knowledge and tools to perform the task safely and effectively.
Pump Removal Preparation
Getting ready to remove your pressure washer pump from the Honda engine is crucial for safe and successful disassembly. Proper preparation minimizes the risk of damage to the pump, engine, and yourself. This involves careful disconnection of hoses and electrical components, proper draining of fluids, and establishing a safe workspace. Following these steps ensures a smooth and efficient procedure.Careful planning and execution are paramount in this process.
Each step, from disconnecting hoses to draining fluids, plays a critical role in the overall success of the pump removal. Ignoring any step could lead to unexpected issues or even damage, so attention to detail is key.
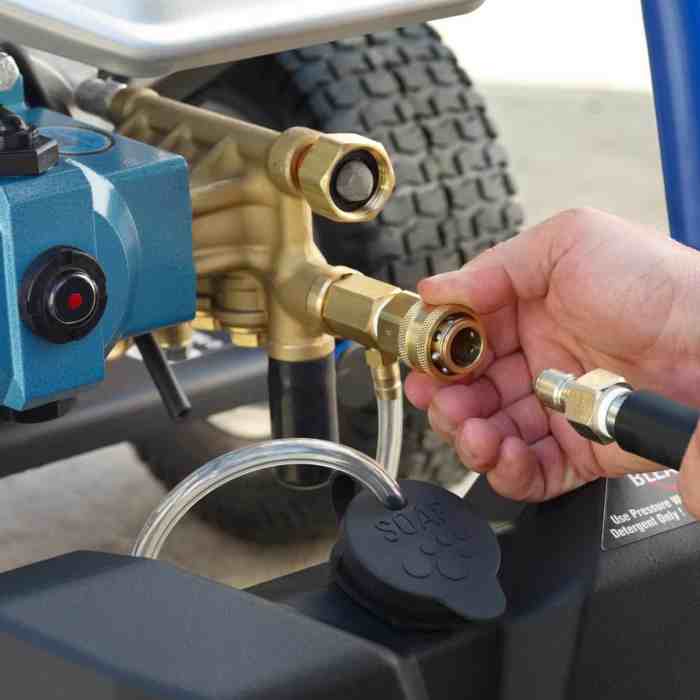
Disconnecting Hoses and Electrical Connections
Properly disconnecting all hoses and electrical connections from the pressure washer pump is essential before attempting to remove it from the engine. This prevents accidental leaks or electrical shocks. Begin by locating all hoses connected to the pump. Carefully identify each hose’s function and mark them for easier reconnection later. Use appropriate tools to disconnect each hose, ensuring a secure grip and preventing damage.
For example, use a wrench to loosen hose clamps, then disconnect the hoses from the pump. Similarly, carefully disconnect all electrical connections, marking and labeling each wire for correct reassembly. This meticulous process prevents issues during reinstallation.
Tools Required for Disassembly
Having the right tools on hand is vital for safe and efficient pump disassembly. The tools needed will vary depending on the specific pressure washer model, but common tools include wrenches (adjustable and open-end), screwdrivers (Phillips and flathead), a socket set, and possibly a pump puller. Consider using a drain pan to collect any possible leaks during the process.
A set of pliers or needle-nose pliers is useful for handling small parts. Ensure all tools are clean and in good working order to prevent damage or injury. Always check the manufacturer’s recommendations for specific tools.
Draining Fluids
Properly draining any remaining fluid from the pump and the engine’s pressure system is crucial to prevent damage and ensure safety. Begin by locating the drain plugs on the pump and the pressure system. Place a suitable container under the drain points to catch the fluid. Open the drain plugs carefully, allowing the fluid to drain completely.
This includes the pump itself, the pressure system, and any associated reservoirs. Allow the system to drain thoroughly before proceeding with the next steps. Dispose of the collected fluid according to local regulations.
Safety Precautions
Using appropriate safety equipment during the removal process is essential to prevent injuries. Eye protection, such as safety glasses or goggles, is vital to shield your eyes from debris or fluid splashes. Protective gloves protect your hands from cuts, scrapes, and potential hazards. Always ensure that the pressure washer is turned off and the power source disconnected before starting any disassembly.
Maintain a clean and organized workspace to prevent accidents. A clear workspace ensures visibility and prevents tripping hazards.
Clean and Organized Workspace
Maintaining a clean and organized workspace is crucial for safe and efficient work. Clear the area around the pressure washer to create ample space for working. Use a workbench or a stable surface to keep tools and components organized. Ensure proper lighting to prevent accidents caused by poor visibility. A well-organized workspace minimizes the risk of slips, trips, and falls, making the process safer and more efficient.
By taking these precautions, you protect yourself and your equipment.
Pump-Engine Connection Analysis

Source: idealpressurewasher.com
Understanding the connection between your pressure washer pump and Honda engine is crucial for a safe and successful removal process. Incorrectly handling fasteners can lead to damage to either component, so careful attention to detail is paramount. This section delves into the specific mounting points and crucial details for a smooth and damage-free disassembly.
Mounting Points and Fasteners
The pressure washer pump is typically secured to the Honda engine using a combination of bolts and possibly some specialized hardware. These fasteners are strategically placed to ensure a robust and reliable connection, enabling the pump to operate effectively and efficiently under pressure. Properly identifying these points and the types of fasteners involved is essential for a successful removal process.
Fastener Identification and Torque Specifications
Different types of fasteners, such as bolts, nuts, and potentially specialized hardware like lock washers, are used in the pump-engine assembly. Each fastener plays a specific role in maintaining the integrity of the connection. The torque specifications are critical; exceeding or falling short of these values can lead to either damage or insufficient security, jeopardizing the integrity of the entire assembly.
Incorrect torque can result in loosening, causing damage during operation, or failure to adequately secure the pump, potentially leading to leaks or misalignment.
| Fastener Type | Location | Torque Specification | Notes |
|---|---|---|---|
| Hex Head Bolts | Connecting the pump’s base plate to the engine block | 50 ft-lbs (68 Nm) | Use a torque wrench for precise tightening. Over-tightening could damage threads. |
| Hex Nuts | Securing pump base plate to the engine | 40 ft-lbs (54 Nm) | Ensure nuts are properly seated against the washer to avoid stress points. |
| Washers (Flat/Lock) | Underneath bolts and nuts | N/A | Essential for proper clamping force and preventing loosening. Check for any signs of wear. |
| Set Screws (if applicable) | Specific pump components or adjustments | Refer to pump manufacturer’s specifications | These screws may require specific tools or techniques for removal. |
Potential Issues and Mitigation Strategies
Corrosion and damage to mounting points are common issues in older or improperly maintained pressure washers. Rust or seized fasteners can significantly hinder the removal process. Thorough inspection of all mounting points is recommended to anticipate and mitigate these problems. Addressing any potential issues like corroded or damaged mounting points before attempting removal will save time and effort.
Using penetrating oil (e.g., WD-40) on the fasteners several hours before attempting to loosen them can help to free up any corroded or seized components.
Important Considerations for Removal
Using the correct tools is crucial to avoid damage during the removal process. A torque wrench is essential for ensuring proper tightening, while appropriate sockets and extensions will help in safely removing fasteners. Following the steps in the pump removal preparation section is important to prevent any accidents. Also, if there are any unusual or unfamiliar parts, consult the owner’s manual for specific instructions or contact a qualified mechanic for assistance.
Pump Removal Procedure

Source: howpowertool.com
Now that we’ve analyzed the pump’s connection to the Honda engine and prepared the necessary tools, let’s delve into the critical steps for safely and effectively removing the pressure washer pump. Proper procedure minimizes strain on the engine’s components and ensures a smooth, damage-free process.
Critical Steps for Pump Removal
Several critical steps are essential for a successful and safe pump removal. These steps involve securing the pump, releasing pressure, and carefully disconnecting components. Understanding these steps is crucial to avoid damage to the engine or pump.
Supporting the Pump During Removal
Supporting the pump during removal is vital to prevent undue stress on the engine’s mounting points. A poorly supported pump can lead to misalignment or damage to the engine’s mounting hardware. A proper support system ensures the pump’s weight is distributed correctly and the engine’s structure is not compromised.
Potential Challenges and Solutions
While the pump removal procedure is generally straightforward, potential challenges might arise. For example, stubborn connections or leaking hoses could cause delays. Proper preparation and problem-solving skills are essential to overcome these challenges. Tools like adjustable wrenches, pliers, and specialized pump removal tools can assist in overcoming these challenges.
Step-by-Step Pump Removal Procedure, How to remove pressure washer pump from honda engine
- Disconnect the pressure washer hoses: Ensure all pressure is released from the system before proceeding. This is paramount to preventing accidental water spurts or damage to the pump or the surrounding area. Use appropriate tools to disconnect the hoses from the pump.
- Secure the pump: Use appropriate straps or clamps to secure the pump to prevent movement during removal. This step is crucial to prevent the pump from swinging or twisting, which could damage the pump or engine.
- Release the pump mounting bolts: Carefully loosen and remove all mounting bolts that secure the pump to the engine. Use appropriate wrenches and tools, paying close attention to the torque specifications to avoid stripping bolts.
- Support the pump: Position a sturdy support beneath the pump to maintain its alignment during removal. This can be a sturdy block of wood, a jack, or other suitable support. This prevents the pump from resting on the engine mounts.
- Disconnect any electrical connections: If applicable, disconnect any electrical connections between the pump and the engine. Properly label and store the wires to prevent confusion later during reassembly.
- Carefully remove the pump: Once all connections are released, carefully lift and remove the pump from the engine, maintaining the support system. This step demands care and precision to avoid damaging any components.
- Inspect the pump and engine: Thoroughly inspect both the removed pump and the engine’s mounting points for any signs of damage or wear. This step allows for immediate identification of potential issues.
Pump and Engine Inspection
Source: pressurecleaned.com
Before diving into the intricate process of removing the pressure washer pump from your Honda engine, a thorough inspection of both components is crucial. This step not only helps identify potential problems but also ensures a smoother and safer removal process, minimizing the risk of further damage. A pre-removal inspection acts as a baseline for evaluating the condition of the pump and engine.Thorough visual inspection of the pressure washer pump and Honda engine is essential before and after removal.
This allows for the detection of pre-existing issues that could lead to problems during the removal process or create complications in reassembly.
Visual Inspection of Components
Pre-removal inspection of the pressure washer pump and Honda engine is vital to assess the overall condition of the components. Inspecting the pump for any signs of wear, cracks, or damage is critical. Look for evidence of previous repairs, which could hint at underlying issues. Examine the pump’s seals and hoses for leaks, which could be indicative of compromised components.
Pay close attention to the engine’s exterior for any signs of damage, such as dents, cracks, or corrosion. Check for leaks from the engine’s various components, including the oil pan, coolant hoses, and gaskets. This comprehensive assessment of the pump and engine’s condition sets the stage for a successful and safe removal procedure.
Potential Damage Due to Improper Handling and Usage
Improper handling or usage can lead to a variety of problems. For example, if the pressure washer pump is repeatedly subjected to excessive pressure, it can lead to cracks or fractures in the pump housing. Likewise, if the engine is not properly lubricated, it can result in damage to internal components. Similarly, overworking the pump without sufficient cooling can lead to overheating and potential warping.
Damage to the pump’s seals or hoses from forceful impact can lead to leaks. Engine damage, including bent shafts, cracked cylinders, or damaged valves, could occur from forceful impacts or extreme pressure. The engine cooling system, if neglected, can lead to overheating, causing significant damage to the engine. Understanding the potential pitfalls of improper handling or usage is essential to maintaining the longevity of the pump and engine.
Potential Causes of Leaks and Solutions
Leaks are a common problem in pressure washers, and often stem from worn-out seals, gaskets, or hoses. A visual inspection should focus on identifying the source of any leaks. Identifying the specific area of leakage is crucial. If a leak is found in the pump, examine the pump’s seals, hoses, and connections for any signs of damage or deterioration.
Engine leaks can stem from a variety of sources, including worn gaskets, damaged hoses, or loose connections. Replacing worn or damaged parts is a common solution.
Common Issues, Causes, and Solutions
| Issue | Cause | Solution | Potential Impact |
|---|---|---|---|
| Pump Housing Cracks | Excessive pressure, impact damage | Replace the pump housing. | Pump failure, potential leakage. |
| Engine Oil Leaks | Damaged oil pan gasket, worn seals | Replace the damaged gasket or seals. | Insufficient lubrication, potential engine damage. |
| Coolant Leaks | Damaged hoses, cracked radiator, loose connections | Replace the damaged hoses, radiator, or tighten connections. | Reduced cooling efficiency, potential engine overheating. |
| Pump Seal Leaks | Worn seals, improper installation | Replace worn seals, ensure proper installation. | Reduced pump efficiency, potential leakage. |
Pump Removal Troubleshooting
Removing a pressure washer pump from a Honda engine can sometimes present unexpected challenges. Understanding potential problems and how to address them is crucial for a successful and safe repair. This section dives into common issues and provides solutions, emphasizing the importance of safety and proper tool usage.Troubleshooting pump removal involves identifying and resolving obstacles encountered during the process.
Incorrect procedures or damaged components can lead to complications, making careful assessment and methodical action essential.
Seized Fasteners
Often, stubborn fasteners are the primary culprits in pump removal. These fasteners, typically bolts or screws, can seize due to rust, corrosion, or inadequate lubrication over time. This can make removal extremely difficult, requiring careful attention and specialized tools.
- Inspection and Assessment: Visually inspect all fasteners for signs of corrosion or damage. Note any unusual tightness or resistance. This preliminary step aids in anticipating potential problems and selecting appropriate tools.
- Using the Right Tools: Employ specialized tools like impact wrenches or a penetrating oil to loosen seized fasteners. Using excessive force can damage the fastener or the surrounding components. Apply penetrating oil generously and allow ample time for it to work its way into the threads before attempting to remove the fastener. Consider using a heat gun (with extreme caution) to help loosen rust.
- Gradual Force Application: Apply gradual force, monitoring for signs of loosening. Sudden or excessive force can strip the fastener head or damage the surrounding components. Work methodically, ensuring each turn of the wrench or impact tool does not introduce undue strain.
- Avoid Overheating: Be cautious when using heat to loosen seized fasteners. Overheating can warp or damage the surrounding metal components. Use a heat gun carefully and monitor the temperature closely.
Damaged Components
Beyond seized fasteners, damaged components within the pump or its connection points to the engine can also impede removal. A fractured mounting bracket or a damaged pump housing, for example, can prevent the pump from detaching smoothly.
- Visual Inspection: Carefully examine the pump housing, mounting brackets, and other connection points for signs of damage. Look for cracks, fractures, or other visible damage. Check for any loose or displaced components that may prevent smooth detachment.
- Replacement Considerations: If damage is discovered, consider replacing the damaged component before proceeding with the removal process. Improperly addressed damaged components can lead to further complications during removal or subsequent engine operation.
- Professional Consultation: If you are uncertain about the extent of the damage or how to proceed, consult a qualified mechanic. Improper repairs can lead to further damage and potentially compromise the integrity of the engine or pump.
Troubleshooting Flowchart
Problem Action Result Seized Fasteners Apply penetrating oil, use impact wrench, heat gun (carefully). Fasteners loosen? Proceed with removal. Fasteners remain seized? Consult a professional. Damaged Components Inspect components for cracks/fractures. Damage observed? Replace damaged part or consult a professional. No damage observed? Proceed with removal. Other Issues Refer to previous steps and review procedure. Issue resolved? Proceed with removal. Issue persists? Consult a professional.
Final Summary: How To Remove Pressure Washer Pump From Honda Engine
In conclusion, the careful removal of the pressure washer pump from a Honda engine requires a methodical approach. By following the Artikeld steps and addressing potential issues, you can successfully complete this task. Remember to prioritize safety, use appropriate tools, and inspect all components thoroughly. A well-maintained system is key to long-term performance.
Popular Questions
What are the most common reasons for pump failure after removal?
Improper torque application on fasteners, inadequate draining of fluids, or ignoring corrosion issues in mounting points are common causes. Pre-existing damage to the pump or engine components could also contribute to issues.
How can I prevent damaging the engine during removal?
Use appropriate support for the pump during removal, ensure proper torque values are followed for each fastener, and carefully monitor the condition of the mounting points. Inspect for signs of wear or damage before and after removal.
What specific tools are needed for this procedure?
The required tools will vary based on the specific pressure washer pump model. However, expect to need wrenches, sockets, and possibly specialized tools for stubborn fasteners, along with safety equipment such as gloves and eye protection.
What if I encounter a seized fastener?
Employ appropriate techniques to loosen the seized fastener, such as using penetrating oil. If the issue persists, consult a professional mechanic. Avoid forceful methods that could damage the engine or pump.


