
How to turn on lectric bike light – How to turn on electric bike lights: a question that might seem simple, but holds a profound significance in the world of safe and responsible cycling. Imagine yourself gliding through the twilight, the wind whispering secrets in your ear, the gentle hum of your electric motor a comforting melody. But what if your path ahead is shrouded in darkness? What if your presence goes unnoticed, a silent ghost in the night?
It is here that the importance of electric bike lights shines through, illuminating not just the road ahead, but also the responsibility we have to ourselves and others.
Electric bike lights are essential for visibility and safety, especially when riding in low-light conditions. They act as beacons, announcing your presence to other road users, preventing accidents and ensuring a smooth and enjoyable ride. Whether you’re navigating through the bustling city streets or exploring the tranquil countryside paths, having functional lights is crucial for a safe and confident journey.
Understanding Electric Bike Lights

Electric bike lights are essential safety features that enhance visibility and ensure a safe riding experience. They illuminate the path ahead for the rider, making it easier to navigate obstacles and see potential hazards, while also making the rider more visible to other road users, reducing the risk of accidents.
Types of Electric Bike Lights
Electric bike lights come in various forms, each designed to serve a specific purpose and enhance safety in different ways.
- Headlights: Mounted on the handlebars, these lights project a beam of light forward, illuminating the path ahead. They are crucial for safe night riding, allowing riders to see obstacles and potential hazards in time.
- Taillights: These lights are typically mounted on the rear fender or seat post, projecting a red light backward to alert other road users of the rider’s presence. They are especially important in low-light conditions and at night, making the rider more visible to vehicles approaching from behind.
- Integrated Lights: Some electric bikes come equipped with integrated lights, which are built into the bike’s frame or components. These lights often include both headlights and taillights, offering a convenient and integrated lighting solution.
Importance of Electric Bike Lights, How to turn on lectric bike light
Functional lights are crucial for safe and enjoyable riding, especially in low-light conditions or at night. They provide several benefits, including:
- Enhanced Visibility: Lights make the rider more visible to other road users, reducing the risk of accidents. They are particularly important for cyclists who share the road with vehicles, as they help drivers see the rider in time and avoid collisions.
- Improved Road Awareness: Headlights illuminate the path ahead, allowing riders to see obstacles and potential hazards in time, such as potholes, debris, or pedestrians. This helps riders avoid accidents and navigate safely.
- Increased Safety: By making the rider more visible and providing better road awareness, lights significantly enhance safety, reducing the risk of accidents and injuries.
Light Features
Electric bike lights vary in features, offering different levels of brightness, beam patterns, and battery life to meet the needs of different riders.
- Brightness: Measured in lumens, brightness determines the intensity of the light emitted by the lamp. Brighter lights offer better visibility and illumination, making them ideal for night riding or low-light conditions. For example, a 1000 lumen headlight can illuminate a significant distance ahead, while a 500 lumen headlight might be sufficient for urban riding.
- Beam Pattern: The beam pattern describes the shape and direction of the light emitted by the lamp. Common beam patterns include flood, spot, and mixed. Flood beams provide a wide, diffused light, ideal for illuminating a broader area, while spot beams project a focused beam, ideal for illuminating distant objects. Mixed beams combine both flood and spot patterns, offering versatility for different riding conditions.
- Battery Life: Battery life refers to the duration the light can operate on a single charge. This varies depending on the light’s power consumption, battery capacity, and usage patterns. For example, a light with a 1000 mAh battery might last for 2-3 hours on a single charge, while a light with a 2000 mAh battery might last for 4-6 hours.
Locating the Light Switch: How To Turn On Lectric Bike Light
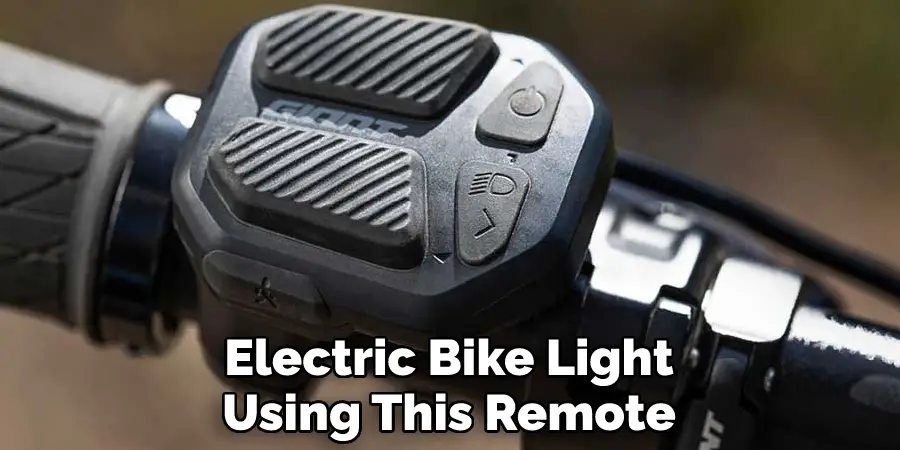
Finding the light switch on your electric bike is crucial for ensuring safe and visible riding, especially during low-light conditions. The switch location can vary depending on the bike model and manufacturer, but common placements include the handlebars, the display, and the frame.
Switch Locations
The placement of the light switch can significantly impact user convenience and accessibility. Here are the most common locations and their advantages and disadvantages:
Handlebar Switches
- Placement: Typically found on the left or right handlebar, often integrated with other controls like the horn or gear shifter.
- Advantages: Easy to reach and operate while riding, intuitive placement for most riders.
- Disadvantages: May interfere with other handlebar controls, potentially leading to accidental activation.
Display Switches
- Placement: Located on the display unit, often integrated with other functions like the speedometer or battery level indicator.
- Advantages: Convenient for riders who frequently check the display, often combined with other bike settings.
- Disadvantages: May require taking your hand off the handlebars to access, potentially distracting while riding.
Frame Switches
- Placement: Found on the frame, usually near the battery or motor, often integrated with other components like the battery lock.
- Advantages: Less prone to accidental activation, can be integrated with other bike functions for a streamlined design.
- Disadvantages: Requires reaching down to operate, potentially inconvenient and less accessible while riding.
Switch Designs
Light switches come in various designs, each with its own advantages and disadvantages:
| Switch Design | Advantages | Disadvantages |
|---|---|---|
| Button Switch | Simple and straightforward operation, readily available. | May require multiple presses for activation, prone to accidental activation. |
| Toggle Switch | Provides clear indication of on/off status, typically robust and reliable. | May require more force to operate, less intuitive for some riders. |
| Rotary Switch | Allows for multiple light modes (e.g., low, high, flash), typically robust. | May be more complex to operate, requires more hand movement. |
Troubleshooting Light Issues
While electric bike lights are generally reliable, issues can arise. Understanding the common causes of light malfunctions can help you diagnose and resolve them efficiently.
Checking the Battery
The most common reason for an electric bike light not turning on is a dead battery.
- Check the Battery Level: Most electric bike lights have a battery level indicator. If the indicator shows low battery, recharge the battery using the appropriate charger.
- Check the Battery Connection: Ensure the battery is properly connected to the light. Inspect the connectors for any corrosion or loose connections. Clean any corrosion and reconnect the battery securely.
Replacing a Blown Bulb
If the battery is charged and the light still doesn’t work, the bulb might be blown.
- Access the Bulb: Locate the bulb compartment on the light. This might involve unscrewing a cover or releasing a clip.
- Remove the Old Bulb: Carefully remove the old bulb.
- Install the New Bulb: Insert the new bulb, ensuring it’s securely seated.
- Test the Light: Turn on the light to verify it’s working.
Troubleshooting a Faulty Switch
A faulty switch can prevent the light from turning on.
- Inspect the Switch: Examine the switch for any visible damage, such as cracks or loose connections.
- Clean the Switch: Use a soft cloth or a cotton swab dipped in rubbing alcohol to clean any dirt or debris that might be interfering with the switch’s operation.
- Test the Switch: After cleaning, try turning the light on and off. If the issue persists, the switch might be faulty.
- Professional Assistance: If you suspect a faulty switch, it’s best to consult a qualified electrician or bike mechanic. They can diagnose the problem and replace the switch if necessary.
Safety Tips for Riding with Lights
Riding an electric bike with lights is not just a safety precaution for nighttime riding; it’s crucial for visibility and safety during all daylight hours. By using lights, you become more visible to other road users, enhancing your safety and reducing the risk of accidents.
Adjusting Light Settings
The brightness of your lights should be adjusted based on the surrounding conditions. When riding during the day, a lower light setting can provide adequate visibility without being blinding to other drivers. However, when riding at night or in low-light conditions, a brighter setting is recommended for maximum visibility.
Benefits of Additional Lights
Beyond the standard bike lights, incorporating additional lights like helmet lights or reflective gear can significantly enhance your visibility.
Helmet lights offer a unique advantage as they are positioned higher than standard bike lights, making you more visible to oncoming traffic.
Reflective gear, such as arm bands, leg bands, or vests, can also be extremely helpful. These reflect light from car headlights, making you more visible to drivers.
So, as you embark on your next electric bike adventure, remember the power of illumination. Turning on your lights is not just a technical step, but a commitment to safety, a silent prayer for a smooth journey, and a testament to the responsibility we share in creating a brighter, safer world for all cyclists. May your path be illuminated, your journey safe, and your ride filled with joy.
FAQ Section
What are the different types of electric bike lights?
Electric bike lights come in various types, including headlights for illuminating the path ahead, taillights for rear visibility, and integrated lights that combine both functions in a single unit.
How long do electric bike lights last?
The battery life of electric bike lights varies depending on the model and usage. Some lights can last for several hours on a single charge, while others might require more frequent recharging.
What should I do if my electric bike lights are not working?
If your lights are not working, first check the battery to ensure it is charged. If the battery is charged, inspect the switch for any damage or malfunction. You may also need to check for a blown bulb. If you suspect a faulty switch, it’s best to seek professional assistance.


