How to repair floor joists with water damage – Repairing water-damaged floor joists might sound daunting, but it’s a task that can be tackled with the right knowledge and a bit of elbow grease. This guide will walk you through the process, from identifying the damage to preventing future issues.
Imagine transforming your home from a soggy mess to a solid foundation, step by step.
Whether you’re dealing with a minor leak or a more significant water intrusion, understanding the signs, assessing the severity, and choosing the appropriate repair method is crucial. We’ll explore techniques like replacement, sistering, and patching, providing clear instructions and essential safety tips along the way.
Identifying Water Damage

Identifying water damage in floor joists is crucial for ensuring the structural integrity of your home. Water damage can weaken the wood, making it susceptible to rot, mold, and even collapse.
Signs of Water Damage
Water damage in floor joists can manifest in various ways. Recognizing these signs can help you address the problem early on.
- Soft or Spongy Floor:If you notice a section of your floor feeling unusually soft or spongy when you walk on it, it could indicate water damage in the underlying joists.
- Sagging Floor:A noticeable sag in the floor can be a clear indication of weakened floor joists due to water damage. The weight of the floor above is putting stress on the compromised joists.
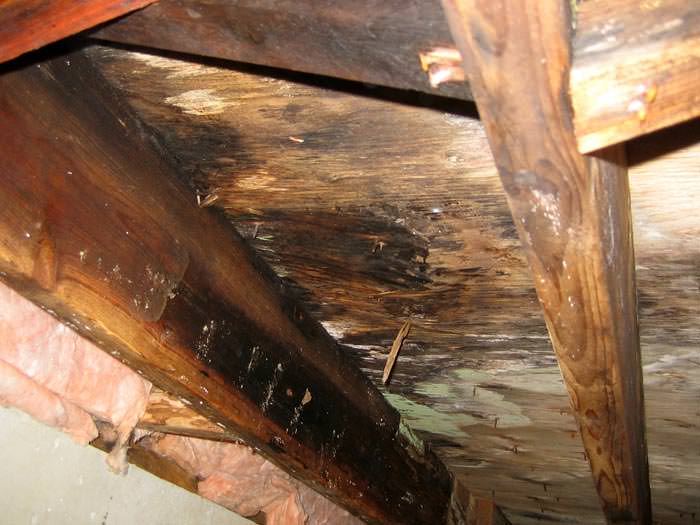
- Visible Mold or Mildew:The presence of mold or mildew on the underside of the floorboards or in the basement, where the joists are exposed, is a strong indicator of water damage. Mold thrives in damp environments.
- Discoloration or Staining:Water damage often leads to discoloration or staining on the wood. Look for dark patches or streaks on the floor joists, especially in areas where water could have entered.
- Musty Odor:A musty or damp smell coming from the floor can be a sign of water damage and the presence of mold or mildew.
Causes of Water Damage
Understanding the potential sources of water damage can help you prevent future issues.
- Leaky Roof:A leaking roof is a common culprit for water damage in floor joists. Water can seep through the roof and travel down into the attic space, damaging the joists below.
- Clogged Gutters:Overflowing gutters can lead to water pooling around the foundation, potentially seeping into the basement and damaging the floor joists.
- Plumbing Leaks:Leaky pipes, especially those located in the attic or basement, can cause significant water damage to floor joists.
- Broken or Damaged Pipes:Frozen pipes can burst, leading to significant water damage in the area where the pipes are located, including floor joists.
- Improper Drainage:Poor drainage around the foundation can allow water to accumulate and seep into the basement, potentially damaging floor joists.
Inspecting Floor Joists
Inspecting your floor joists for water damage is essential for maintaining the structural integrity of your home.
- Access the Joists:If possible, access the joists from the basement or crawl space. This will allow you to visually inspect them for signs of damage.
- Check for Softness:Tap on the joists with a hammer or your fist. If the sound is hollow or the wood feels soft, it could indicate water damage.
- Look for Mold:Check for signs of mold or mildew on the joists, especially in areas where water could have entered.
- Inspect for Discoloration:Look for any discoloration or staining on the joists, as this can be a sign of water damage.
- Measure Moisture Levels:Use a moisture meter to check the moisture levels in the joists. High moisture levels indicate water damage and the potential for mold growth.
Assessing the Damage
Once you’ve identified the water damage, the next step is to assess its severity. This involves understanding the extent of the damage and its impact on the structural integrity of the floor joists.
Determining the Severity of Water Damage
The severity of water damage can be determined by examining the affected floor joists. Look for signs of rot, warping, and softening.
- Rot:Soft, spongy wood indicates rot. This can range from minor surface rot to deep, extensive rot that weakens the joist.
- Warping:If the joist is bent or twisted, this indicates warping. Warping can occur due to moisture absorption and uneven drying.
- Softening:If the wood feels unusually soft or mushy, this suggests that the joist has been significantly weakened by water damage.
Factors Influencing the Repair Process
Several factors influence the repair process for water-damaged floor joists, including:
- Extent of Rot:The amount of rot present will determine the extent of the repair. Minor rot can be treated with wood hardener or epoxy, while extensive rot may require replacing the entire joist.
- Type of Wood:The type of wood used for the floor joists will affect its resistance to rot and the repair options. For example, softwoods like pine are more susceptible to rot than hardwoods like oak.
- Structural Integrity:The structural integrity of the damaged joist is crucial. If the joist is significantly weakened, it may need to be replaced to ensure the floor’s stability.
Evaluating Structural Integrity
To evaluate the structural integrity of a damaged floor joist, consider the following:
- Deflection:Check for any visible sagging or deflection in the floor. Excessive deflection indicates a weakened joist that needs repair or replacement.
- Load Capacity:Assess the load capacity of the damaged joist. If the joist can no longer support the weight it was designed for, it needs to be reinforced or replaced.
- Joist Spacing:Examine the spacing between the floor joists. If the spacing is too wide, the joists may not be able to support the floor adequately, especially if some are damaged.
It’s important to note that if you are unsure about the extent of the damage or the structural integrity of the floor joists, it’s best to consult with a qualified structural engineer or contractor. They can provide a professional assessment and recommend the appropriate repair or replacement options.
Repairing Damaged Floor Joists

After assessing the damage, you can begin the repair process. The method you choose will depend on the severity of the damage and the structural integrity of the joists.
Replacing Damaged Floor Joists, How to repair floor joists with water damage
Replacing damaged floor joists is the most effective method for restoring structural integrity. This approach involves removing the damaged joist and installing a new one. Replacing a floor joist requires careful planning and execution. Here is a step-by-step guide:* Step 1: Prepare the work area.Clear the area around the damaged joist and ensure proper ventilation.
Step 2
Support the surrounding joists. Use temporary supports, such as jack stands or cribbing, to prevent the floor from sagging.
Step 3
Remove the damaged joist. Cut the damaged joist at the ends and remove it carefully.
Step 4
Install the new joist. Position the new joist in place, ensuring it aligns with the existing joists. Secure it using joist hangers or other appropriate fasteners.
Step 5
Reinforce the joist. If necessary, sister the new joist with an existing joist for added strength.
Step 6
Remove temporary supports. Once the new joist is securely installed, remove the temporary supports.
Step 7
Finish the repair. Install flooring or subflooring over the repaired area, and ensure it is properly secured.Materials needed for replacing a floor joist:
- New floor joist, matching the size and specifications of the existing joists
- Joist hangers or other suitable fasteners
- Temporary supports (jack stands, cribbing)
- Saw
- Level
- Hammer
- Safety gear (gloves, eye protection)
Sistering Damaged Floor Joists
Sistering is a common repair method for floor joists with minor damage. This involves attaching a new piece of lumber, called a sister joist, alongside the damaged joist. The sister joist provides additional support and strength to the damaged joist.Here is a step-by-step guide for sistering a floor joist:* Step 1: Prepare the work area.Clear the area around the damaged joist and ensure proper ventilation.
Step 2
Cut the sister joist. Measure the length of the damaged joist and cut the sister joist to match.
Step 3
Secure the sister joist. Attach the sister joist to the damaged joist using joist hangers or other suitable fasteners. Make sure the sister joist is flush with the damaged joist and securely fastened.
Step 4
Reinforce the connection. Use additional fasteners to reinforce the connection between the sister joist and the damaged joist.
Step 5
Finish the repair. Install flooring or subflooring over the repaired area, and ensure it is properly secured.Materials needed for sistering a floor joist:
- Sister joist (lumber matching the size and specifications of the existing joists)
- Joist hangers or other suitable fasteners
- Saw
- Drill
- Level
- Hammer
- Safety gear (gloves, eye protection)
Patching Damaged Floor Joists
Patching is a repair method suitable for minor damage, such as small cracks or holes. This involves filling the damaged area with wood filler or epoxy and smoothing it out.Here is a step-by-step guide for patching a floor joist:* Step 1: Prepare the work area.Clear the area around the damaged joist and ensure proper ventilation.
Step 2
Clean the damaged area. Remove any loose debris or splinters from the damaged area.
Step 3
Apply wood filler or epoxy. Fill the damaged area with wood filler or epoxy, ensuring it is completely filled.
Step 4
Smooth the filler. Once the filler has dried, smooth it out with sandpaper to create a smooth surface.
Step 5
Finish the repair. Install flooring or subflooring over the repaired area, and ensure it is properly secured.Materials needed for patching a floor joist:
- Wood filler or epoxy
- Putty knife
- Sandpaper
- Safety gear (gloves, eye protection)
Preventing Future Water Damage: How To Repair Floor Joists With Water Damage
Repairing damaged floor joists is a significant step in restoring your home’s structural integrity. However, the true success lies in preventing future water damage. Addressing the root cause of the water damage is crucial to ensure long-term protection for your home.
Preventing Future Water Damage
Preventing future water damage to floor joists requires a proactive approach. Identifying and addressing the source of the problem is paramount. Here are some crucial steps to take:
- Inspecting Plumbing:Leaky pipes are a common culprit for water damage. Regular inspections of plumbing systems, including pipes, fixtures, and appliances, can help identify and address leaks before they escalate into major problems. Look for signs of corrosion, cracks, or loose connections.
Addressing these issues promptly can prevent significant water damage.
- Roof Maintenance:A damaged roof is another primary source of water damage. Regular roof inspections are essential to identify and repair leaks promptly. Look for missing or damaged shingles, cracked flashing, and clogged gutters. Maintaining a well-functioning roof is crucial to prevent water from seeping into the attic and damaging floor joists.
- Exterior Drainage:Proper drainage around the foundation is vital to prevent water from pooling and infiltrating the structure. Ensure downspouts direct water away from the foundation. Grade the surrounding soil to encourage water runoff. Avoid planting trees or shrubs too close to the foundation, as their roots can damage drainage systems.
- Ventilation:Adequate ventilation is crucial to prevent moisture buildup in the attic and crawl spaces. Proper ventilation allows for air circulation, which helps to dry out these areas and prevent the growth of mold and mildew. Install vents in the attic and crawl space to ensure proper air circulation.
- Moisture Control:Excessive moisture can lead to wood rot and damage to floor joists. Controlling moisture levels is essential to prevent these problems. Install moisture barriers in crawl spaces and attics. Ensure proper insulation to prevent heat loss and condensation. Use dehumidifiers in areas prone to moisture buildup.
Proper Ventilation and Moisture Control
Proper ventilation and moisture control are essential components of preventing future water damage to floor joists.
- Ventilation:Adequate ventilation allows for air circulation, which helps to dry out attics and crawl spaces. This prevents moisture buildup and the growth of mold and mildew. Proper ventilation also helps to regulate temperature, reducing the risk of condensation and wood rot.
- Moisture Control:Excessive moisture can lead to wood rot and damage to floor joists. Controlling moisture levels is crucial to prevent these problems. Moisture barriers can be installed in crawl spaces and attics to prevent moisture from penetrating the structure. Proper insulation helps prevent heat loss and condensation, further reducing moisture buildup.
Dehumidifiers can be used in areas prone to moisture buildup to remove excess moisture from the air.
Safety Considerations

Repairing water-damaged floor joists is a serious task that requires careful planning and execution. Neglecting safety precautions can lead to serious injuries. It’s crucial to prioritize safety throughout the entire repair process, from assessing the damage to cleaning up the work area.
Using Appropriate Safety Equipment
Using the right safety equipment is crucial for minimizing risks and protecting yourself from potential hazards. This includes:
- Safety Glasses:Protect your eyes from flying debris, dust, and chemicals.
- Gloves:Protect your hands from splinters, sharp edges, and chemicals.
- Hearing Protection:Protect your ears from loud noises generated by power tools.
- Respirator:Protect your lungs from dust and fumes.
- Work Boots:Provide support and protection for your feet, especially when working on uneven surfaces.
Working Safely Around Potential Hazards
Working with damaged floor joists presents several potential hazards. Here’s a guide to working safely around them:
- Structural Integrity:Damaged floor joists may be weakened and could collapse under weight. Avoid walking or placing heavy objects on the affected area.
- Mold and Mildew:Water damage often leads to mold and mildew growth. Wear a respirator and protective clothing to avoid inhaling spores.
- Electrical Hazards:Water damage can compromise electrical wiring. Before working in the area, ensure power is disconnected.
- Falling Objects:Damaged floor joists may have loose or falling debris. Use caution when working overhead.
- Sharp Objects:Exposed nails, screws, and other sharp objects pose a risk of injury. Wear gloves and be mindful of your surroundings.
Safety Tips for Working on Floor Joists
Here are some additional safety tips to keep in mind when working on floor joists:
- Inspect the area carefully before starting work.Identify potential hazards and take steps to mitigate them.
- Use proper lifting techniques.Avoid lifting heavy objects alone.
- Keep the work area clean and organized.This will help prevent accidents and injuries.
- Take breaks when needed.Avoid fatigue, which can increase the risk of accidents.
- Stay hydrated.Drink plenty of water, especially when working in hot or humid conditions.
- Never work alone.If possible, have someone else present in case of an emergency.
Safety Precautions for Using Power Tools
Power tools are essential for many floor joist repair tasks. Here are some safety precautions to follow:
- Read the instruction manual carefully before using any power tool.Familiarize yourself with its operation and safety features.
- Use the appropriate tool for the job.Don’t try to use a tool for a purpose it wasn’t designed for.
- Maintain your power tools regularly.Ensure they are in good working order and have sharp blades or bits.
- Use safety guards and other protective devices.These help to reduce the risk of injury.
- Avoid using power tools in wet or damp conditions.This can increase the risk of electrical shock.
Final Conclusion

Tackling water-damaged floor joists might seem like a daunting task, but with the right approach, you can restore your home’s structural integrity and prevent future problems. By following the steps Artikeld in this guide, you’ll gain the confidence to tackle this project head-on, ensuring a safe and stable living environment for years to come.
Remember, a little bit of knowledge goes a long way in home repair, and with the right tools and techniques, even the most challenging tasks become achievable.
Common Queries
Can I repair minor water damage myself?
For minor damage, like a small soft spot, you might be able to patch it yourself. However, for significant damage or structural concerns, it’s best to consult a professional.
What are the signs of severe water damage?
Severe damage often includes significant sagging, visible rot, and a spongy feel when walking on the floor. It’s crucial to seek professional help in these cases.
How long does it take to repair water-damaged floor joists?
Repair time varies depending on the severity of the damage and the chosen repair method. Minor repairs can be completed within a day, while extensive work might take several days or weeks.
What if I can’t identify the source of the water damage?
If you’re unsure about the source, it’s essential to hire a professional to investigate and address the root cause before attempting repairs.